 Smartphone Basics: Essential Functions and Everyday Use
Smartphones have become a big part of everyday life for many people, including seniors. These tiny devices fit in your hand but hold a world of possibilities. From making calls to sending messages, taking photos, and even video chatting with family, smartphones help you stay connected and do many tasks easily. However, learning to use a smartphone for the first time can feel overwhelming because of all the buttons, screens, and apps. Understanding the basic parts and how they work is the first step toward gaining confidence and independence.
Think of a smartphone as a small, powerful tool with many features designed to make your life easier and more fun. By getting to know its physical parts, like the screen, buttons, cameras, and ports, and learning how to use simple actions like tapping and swiping, you’ll find it much simpler to navigate your phone. This knowledge not only helps you start using the device but also opens doors to staying in touch with loved ones, enjoying video calls, reading messages, and even browsing the internet safely.
In this lesson, you will learn essential smartphone functions that help with communication, entertainment, and daily tasks. You’ll discover how to turn your phone on and off properly to keep it running smoothly, how to take care of your battery through smart charging habits, and how to adjust volume and screen brightness for comfort. We’ll also cover how to understand the home screen and icons, make and receive calls, send and read text messages, and use the camera to capture your memories.
By mastering these basics, you’ll build a strong foundation that makes using smartphones much less confusing and frustrating. This will help you become more independent, stay connected with family and friends, and use technology confidently in your daily life. Whether you’re new to smartphones or want to refresh your skills, this lesson aims to empower you with practical, easy-to-understand tips to get the most out of your device.
Getting to Know the Physical Parts of a Smartphone
When you hold a smartphone in your hand, it might look like a small, simple rectangle. But this rectangle has many important parts that help it work. Knowing what these parts are and what they do can make using the phone much easier and less confusing. Let’s take a close look at the main parts you will find on most smartphones, especially those designed with seniors in mind.
- Screen (Display): This is the large glass area on the front of the phone. It shows everything you see — like pictures, words, buttons, and videos. It is usually a touchscreen, which means you can tap, swipe, and scroll right on the screen with your fingers. The screen is like a TV or computer monitor, but smaller and fits in your hand.
- Front Camera: This little lens is usually found at the top front of the phone. It lets you take selfies or make video calls so you can see the person you are talking to, and they can see you.
- Back Camera: This is on the back side of the phone. It is used to take pictures and videos of people, places, or anything you want to remember. Phones may have one or more cameras on the back.
- Home Button or Navigation Buttons: Some phones have a physical button below the screen called the Home button. Pressing this takes you back to the main screen no matter where you are in the phone. If there is no button, you will usually see special icons on the screen that do the same job. These are called navigation buttons.
- Speaker: The speaker is a small hole or set of holes on the phone where sound comes out. This lets you hear the other person during a call, music, videos, or alerts like ringing and notifications.
- Microphone: This tiny hole picks up your voice when you talk so the other person can hear you clearly. There is usually more than one microphone to help reduce background noise.
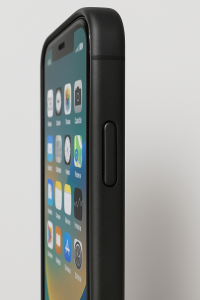
- Power Button: This button turns the phone screen on or off and lets you turn the phone on or off completely. It is often on the side or the top edge of the phone and may be a bit raised so you can find it by touch.
- Volume Buttons: These buttons control how loud or soft the sound is. You can make the ringer louder when you get a call or turn down the volume if it’s too loud. They are usually found on the side of the phone.
- Charging Port: This is the place where you plug in the charger to add power to your phone. It is often on the bottom edge. Some phones use a small, flat cord called a USB-C, while others use a tiny connector called Lightning (mostly on Apple phones).
- Headphone Jack (if available): Some phones have a round hole where you can plug in regular wired headphones or earbuds. Many newer phones do not have this and instead use wireless headphones that connect by Bluetooth.
- SIM Card Slot: This is a small slot or tray where the SIM card goes. The SIM card is like your phone’s ID card; it connects your phone to the mobile network so you can make calls and use the internet. You usually need a small tool or paperclip to open this slot.
Each of these parts has an important role in helping your smartphone work well. For example, the screen shows you your contacts, messages, and apps, while the power button helps you start or stop using the phone easily. Knowing where these parts are will help you feel more comfortable and confident when using your device.
How to Recognize the Buttons and Their Functions
Smartphones often have several buttons around their edges and sometimes on the front. Let’s talk about these buttons in a way that makes it easy to remember what each one does.
- Power Button: Usually the longest or most noticeable button on the side or top edge. Press it once to turn the screen on or off. If you hold it down for a few seconds, you might see options to turn the phone off or restart it. Think of this button as the phone’s “on/off switch.”
- Volume Buttons: Usually two small buttons just one above the other on the side. The top one raises the sound, and the bottom one lowers it. If you hold them down, the sound changes quickly. You can use these when on a call, watching videos, or listening to music.
- Home Button or On-Screen Navigation: On some phones, especially simpler models for seniors, there may be a big button or icon on the screen shaped like a circle or square. Pressing it brings you back to the main screen. If your phone does not have a physical home button, look for icons like a house or arrow at the bottom of the screen.
- Back Button: This button usually looks like an arrow pointing left or the word “Back.” It helps you go back one step if you opened something by mistake or want to return to the previous screen.
- Recent Apps Button: This lets you see thumbnails (small pictures) of all the apps you have open, so you can switch quickly between them. It usually looks like a square or two overlapping rectangles.
On some smartphones made especially for seniors, these buttons might be bigger or more clearly labeled to make them easier to find and press. For example, they may have large print or high-contrast colors to help users with vision problems.
Understanding the Touchscreen and Its Gestures

The touchscreen is the heart of modern smartphones. Instead of clicking physical buttons like on old phones, you use your fingers to interact directly with what you see on the screen. Here are some common ways to use the touchscreen:
- Tapping: This is like clicking a mouse. You touch the screen quickly with one finger to select or open something, such as an app or message.
- Swiping: Slide your finger across the screen without lifting it. Swiping left or right can move you through photos or pages. Swiping up or down scrolls through lists or websites.
- Pinching: Place two fingers on the screen and bring them together to make things smaller (zoom out), or spread them apart to make things bigger (zoom in). This is useful for reading small text or looking at pictures closely.
- Press and Hold: Touch and hold your finger on an icon or word for a couple of seconds. This action might bring up extra options like moving an app, deleting a message, or copying text.
Some phones also have a setting that makes the touch area bigger or the buttons larger, which can help if your fingers are shaky or if you have trouble tapping small targets. Learning these gestures takes a bit of practice but makes using your phone much easier.
Special Buttons and Features for Safety and Ease
Many smartphones designed for seniors include extra buttons and features that help with safety and ease of use: 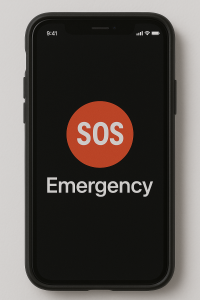
- Emergency or SOS Button: Some phones have a special button you can press in an emergency. Pressing it can call a designated contact or emergency services automatically and send your location. This button is usually easy to find, sometimes on the back or side of the phone, and may be marked “SOS.”
- Voicemail Button: Certain phones offer a dedicated voicemail button on the screen or keypad. This makes it easy to listen to messages left by callers without navigating through many menus.
- Shortcut Buttons: Some phones let you set up buttons for quick access to favorite contacts or apps. For example, you might have a button that calls your child or opens your calendar with just one press.
- Keypad Display Button: On some phones, especially flip or block types, there’s an option to bring up a large on-screen keypad for dialing, making it easier to enter numbers without needing to look for small buttons.
These added features make smartphones safer and simpler for seniors to use, especially for those who may have trouble navigating complex menus or remembering phone numbers.
Visual and Touch Helpers on Smartphones
 To make the phone easier to use, many smartphones come with tools that help you see and touch the screen better:
- Large Buttons and Text: Many phones let you make the buttons on the screen bigger and the text easier to read. This helps if your eyesight is not as sharp as it used to be.
- High Contrast Colors: Some phones use bright colors for buttons and text to stand out against the background. This makes things easier to spot quickly.
- Voice Commands and Voice Typing: Instead of typing, you can talk to the phone, telling it what to do or what message to write. This helps if you find typing hard or slow.
- Haptic Feedback: This means the phone gives a little buzz or vibration when you press a button or icon. It lets you know the phone felt your touch, which can be reassuring if your hands shake or you have trouble pressing accurately.
These helpers are usually set up in the phone’s settings menu under names like “Accessibility” or “Ease of Use.” Taking the time to adjust these settings can make a big difference in how comfortable you feel using your smartphone every day.
Turning the Device On and Off: Why It Matters and How It Helps
Turning your smartphone on and off might seem like a simple task, but it’s actually very important. This basic action can help keep your phone running smoothly and can fix many common problems. In this section, we will explore why turning your device off and on again is helpful, how it works inside your phone, and some tips on when and how to do it properly. Understanding this will give you more confidence and control over your smartphone, making your experience more enjoyable and less frustrating.
Think of your smartphone like a busy kitchen in a restaurant. When the kitchen is working non-stop all day, pots, pans, and counters get messy, and sometimes things get out of order. Turning your phone off is like closing the kitchen for a little while to clean up and organize everything. When you turn it back on, the kitchen is clean, and the cooks can start fresh, making everything work better again.
What Happens Inside When You Turn Your Phone Off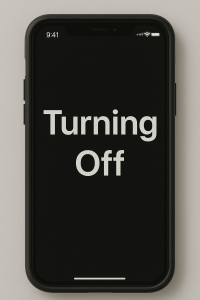
When you press the power button to turn off your phone, several important things happen inside it:
- Stopping all running programs: Your phone runs many programs or apps at the same time, like your email, calendar, music player, and more. Turning it off stops all these programs so they don’t continue using memory or resources.
- Clearing temporary memory (RAM): Your phone uses a type of memory called RAM to run apps quickly. This memory holds temporary information that your phone uses while it’s on. Turning off the phone clears this memory, removing any leftover data that might be slowing things down.
- Pausing all connections: Your phone connects to Wi-Fi, cellular networks, Bluetooth devices, and more. Turning it off temporarily ends all these connections, helping refresh them when you turn your phone back on.
- Cooling down the battery: Batteries work better and last longer when they have breaks. Turning off the phone allows the battery to cool, which can help it stay healthy over time.
Because all these things happen, turning off your phone is like hitting a reset button for your device’s brain and body. It helps it to stop doing too many things at once and start fresh again.
How Turning Your Phone On Resets Things
After a shutdown, when you press the power button to turn your phone back on, it goes through a startup process. This process is like waking up your phone’s brain and body and getting everything ready to work properly again. During startup:
- Your phone reloads its main system, called the operating system, which controls everything you do on the device.
- It opens necessary background programs and services that help your apps and features work correctly.
- Your phone reconnects to networks like Wi-Fi and cellular service, giving you fresh connections that often work better than before.
- The phone checks for any software updates or notifications that might need your attention.
This restart process can fix small glitches or slowdowns that happen when your phone has been on for a long time without a reset. It’s a simple but powerful way to keep your device running smoothly.
Common Problems That Turning Your Phone Off and On Can Fix
Many everyday problems with smartphones can be solved just by turning them off and on again. Here are some examples:
- Slow performance: If your phone feels sluggish or slow, restarting it can free up memory and close apps running in the background that you may not even know are still open.
- Frozen or unresponsive screen: Sometimes the screen stops reacting to your touch. Turning the phone off and on again can reset the screen’s functions and fix this.
- App crashes: If an app keeps closing unexpectedly or not working properly, a restart can stop the app’s broken processes and allow it to work better.
- Connectivity issues: Problems with Wi-Fi, cellular signals, or Bluetooth connections often improve after a reboot because it resets these network services.
- Notification problems: If you stop receiving alerts or messages, restarting can refresh the system handling notifications.
In many cases, IT professionals recommend restarting your device as the first step in troubleshooting because it is quick, easy, and effective.
How Often Should You Turn Your Phone Off?
Experts suggest that turning off your phone regularly is a good habit. It is like cleaning your smartphone’s "digital house." Here are some guidelines:
- At least once a week: Turning your phone off once every week helps clear out memory, close unnecessary processes, and improve battery health.
- Whenever it acts strange: If your phone starts to slow down, freeze, or have trouble with apps or connections, try turning it off and on before trying other fixes.
- Before and after updates: When your phone installs new software updates, it usually needs to restart. You can also manually restart after updates to make sure everything works correctly.
- Daily shutdown is optional: Some people turn off their devices every day to help battery life and security, but once a week is a good minimum.
Just like taking a little break helps people feel refreshed, turning your phone off regularly helps it perform better and last longer.
How to Properly Turn Your Phone Off and On
Turning your phone off and on might be different depending on the brand or model, but the steps are similar. Here’s a simple way to do it:
- To turn off: Press and hold the power button (usually located on the side or top of the phone) for a few seconds until you see options on the screen. Select “Power Off” or “Shut Down.” Wait a few seconds until the screen goes completely dark.
- To turn on: Press and hold the power button again until you see the phone’s logo or welcome screen. The phone will start up and be ready to use in a minute or two.
If your phone freezes and won’t turn off using the normal method, you can perform a “force restart” by pressing a combination of buttons. This varies by phone type, so check your phone’s manual or ask for help if needed.
Extra Tips for Seniors to Keep Devices Running Smoothly
Since smartphones have many functions running at the same time, here are some extra tips to help your device stay in good shape:
- Close apps when you’re done: Closing unused apps before turning off your phone helps clear memory faster.
- Update software regularly: Updates fix bugs that can cause your phone to slow down or crash. After updates, a restart may be required.
- Clear cache occasionally: Cache is temporary data stored by apps. Clearing it every once in a while can speed up your phone. (Don’t worry, your phone will rebuild new cache when needed.)
- Backup important data: Before doing any resets or updates, make sure your photos, contacts, and files are safely backed up, just in case.
Using these habits along with regular restarts helps you enjoy your smartphone without many troubles.
Turning Off for Security and Privacy
Turning your phone off isn’t just good for performance—it also helps protect your personal information. When your phone is off, it cannot be hacked or accessed remotely. This is especially useful if you are in public places or traveling and want to be extra safe. Powering down also helps protect your device from unwanted connections that might happen when it’s on for long periods.
In addition, turning off your phone daily or weekly reduces the chance of software problems or viruses that can occur if your device stays on and connected all the time without a break.
Remembering to Turn Off and On Can Save You Time and Frustration
Many seniors find technology confusing and frustrating when it doesn’t work as expected. But turning your smartphone off and on is a simple tool that can solve many problems quickly. It means less waiting for help, fewer calls to tech support, and more time enjoying your device.
Keep this simple step in mind as your first go-to fix. It’s easy, fast, and often solves the problem without needing complicated instructions. Being comfortable with this basic function makes you more independent with your smartphone and helps you use it confidently every day.
Charging and Maintaining Battery Life
Smartphones are powered by a special kind of battery called a lithium-ion battery. These batteries are very common because they can hold a lot of energy and are lightweight. However, they also need proper care so they can last a long time and work well every day. Understanding how to charge and take care of your phone’s battery can help you avoid problems and keep your phone feeling fresh for years.
Here, we will explore some important ideas about charging habits and how to maintain your battery’s health easily, without needing to be a tech expert. Think of your smartphone battery like a small rechargeable tank of power. How you fill and use this tank will decide how long it lasts and how well it performs.
How to Best Charge Your Smartphone Battery
One of the most common questions is: “When should I charge my phone, and how much?” Here are some simple rules to help you get the best out of your battery:
- Avoid letting your battery go down to 0% — It’s better not to let your phone’s battery completely run out of power. When the battery level gets too low, it can cause stress and damage over time.
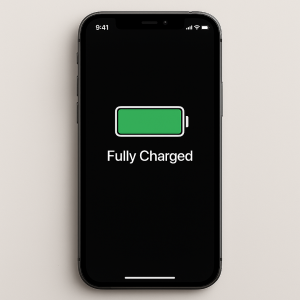
- Try to keep your battery charged between 20% and 80% — Charging your phone in this range is like filling a glass without overflow. It helps keep the battery’s inside parts healthy and reduces wear. Charging fully to 100% or letting it drop too low can harm the battery’s chemistry.
- Charge in small bursts instead of one full charge — Instead of waiting for your phone to be nearly empty and then charging it all the way to 100%, try topping it up more often. This means plugging in for shorter times throughout the day.
For example, if you notice your battery is at 30%, plugging it in to reach about 70-80% is better than waiting for it to hit 5% and charging to 100%. This method is gentle for the battery cells and can extend their lifespan.
Is It Okay to Charge Your Phone Overnight?
You might be used to plugging in your phone when you go to bed and unplugging it in the morning. Modern smartphones have smart technology that stops charging once the battery reaches 100%, so they don’t keep “overcharging.” This means your phone won’t keep pushing power into the battery all night, which helps avoid damage.
However, keeping your phone plugged in for a long time while it stays fully charged can still cause some stress on the battery over months and years. The battery feels a bit like it is “stressed” when it stays at 100% for too long. Some phones now have special settings called “optimized charging” to help pause charging once it reaches around 80% and then finish charging later just before you wake up. This helps reduce battery wear if you charge overnight.
If your phone doesn’t have this feature, or you want to be extra careful, try to unplug your phone after it reaches a high charge. You can also use a smart plug that turns off power after a certain time. But don’t worry too much — if you charge overnight occasionally, your phone’s battery will still be fine thanks to these built-in protections.
Using the Right Charger Matters
Always use the charger that came with your phone or a certified replacement recommended by the phone maker. Chargers are designed to deliver the correct amount of power safely.
Using cheap or unofficial chargers can harm your battery. These chargers might deliver too much or too little power, or create heat, which can damage your battery over time and even be unsafe.
Think of it like filling a glass of water — if the water flows too fast, it can spill everywhere and cause a mess. A good charger fills your battery smoothly and safely without causing stress.
Keep Your Phone Cool While Charging
Heat is one of the biggest enemies of battery health. When batteries get hot, they age faster and lose capacity sooner. Avoid charging your phone in hot places like direct sunlight, inside a hot car, or under a blanket where heat can build up.
If you notice your phone gets hot while charging, try to remove any thick cases that might trap heat. Let the phone rest or cool down if it feels warm to the touch before charging again.
Keeping your phone cool during charging helps the battery cells stay healthy and last longer.
Partial Charging Helps Battery Health
Charging your phone only partway, instead of to a full 100%, helps keep the battery happy. Experts recommend aiming for about 80% charge when possible, unless you really need that full battery power for the day ahead.
For example, if you only need your phone to last a few hours, charging it to 50 or 60% might be enough and is better for the battery in the long run.
This idea may sound strange because we want to have as much charge as possible, but partial charges keep the battery from working too hard and reduce the natural wear that happens when charging fully.
Avoid Letting Your Battery Completely Die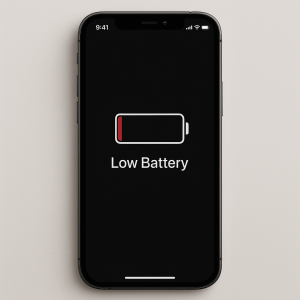
Many people think they should let their battery die fully before charging. This is actually not good for lithium-ion batteries. Letting the battery drain completely (0%) can cause damage and shorten its lifespan.
Try to plug in your phone when the battery reaches around 20%. This helps reduce stress on the battery’s internal parts and keeps it healthier over time.
Slow Charging Is Better Than Quick Charging for Battery Health
Fast charging technologies are very handy because they save time. But charging your phone slowly when you don’t need a quick top-up is better for the battery’s health. Slow charging produces less heat and stress inside the battery, helping it last longer.
For example, if you have several hours to charge overnight or while relaxing, using a slower charger or a lower power setting is a gentler way to fill your battery’s “tank.”
However, if you are in a hurry, quick charging is fine occasionally. Just don’t make it your only method all the time.
Store Phones and Batteries Properly When Not in Use
If you plan to leave your smartphone unused for a while, it’s important to store it the right way to protect the battery:
- Charge the battery about halfway (around 50%) before storing — This level helps protect the battery’s health during storage.
- Keep the phone in a cool, dry place — Avoid places that are too hot, too cold, or humid, like a hot attic or a damp basement.
- Check and recharge the battery every few months — Batteries discharging completely while stored can get damaged.
Proper storage ensures the battery doesn’t lose its ability to charge well when you start using the phone again.
Watch Out for Power-Hungry Apps and Usage
Some apps use a lot of energy, which can drain your battery quickly and cause the battery to wear out faster. Games with bright graphics, navigation apps that use GPS, or apps running many tasks in the background can make your battery work hard.
Try to close apps you’re not using and avoid running too many power-heavy apps at once. This reduces battery strain and helps keep your phone running longer between charges.
Monitor Your Battery's Health with Your Phone’s Tools
Many smartphones have built-in tools you can check to see how healthy your battery is. These tools tell you the battery’s current capacity compared to when it was new and can show you if the battery is wearing out.
For example, you might find this option in your phone’s settings under “Battery Health” or “Battery Information.” If the battery health drops a lot, it means the battery won’t last as long, and you might want to consider getting it replaced to keep your phone working well.
Summary of Best Habits for Charging and Battery Care
- Charge your phone regularly in small amounts rather than waiting for it to be empty.
- Keep the battery level between 20% and 80% most of the time.
- Use the charger that came with your phone or a trusted replacement.
- Don’t let your phone get too hot while charging; keep it cool and avoid direct sunlight.
- Partial charging is better than always charging to full 100%.
- Avoid letting your battery die completely before charging.
- Charge slowly when you have time; save fast charging for when you really need it.
- Store phones properly when unused, keeping them around 50% charged and in a cool, dry place.
- Close energy-heavy apps to reduce battery strain.
- Check your phone’s battery health status regularly to know when to replace the battery if needed.
By following these simple charging and maintenance habits, you can help your smartphone’s battery stay healthy longer. A happy battery means your phone will be ready when you need it, for calls, messages, photos, and all the things that keep you connected to family and friends.
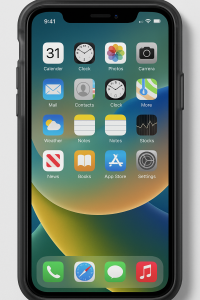
Understanding the Home Screen and Icons
The home screen on a smartphone is like your main dashboard or control center. It is the first screen you see when you unlock your phone. Think of it as the front door to your phone’s many features and apps. The home screen shows a collection of pictures called icons. Each icon is like a shortcut or a button that opens a specific app or function on your phone.
Icons are important because they help you quickly find and open the apps you want to use. For example, there will be icons for the Phone app, Messages app, Camera app, and many more. Each icon usually has a small picture and a label underneath it explaining what the app is. For instance, the Phone app icon often looks like a classic telephone receiver, while the Camera app icon might look like a small camera.
Most smartphones arrange these icons in a grid of rows and columns. You can see them all at once and tap the one you want to open. Just like pressing a button on a remote control, tapping an icon opens the app connected to it. After you finish with the app, you can return to the home screen to pick another app. On many smartphones, this is done by pressing the “Home” button or swiping up from the bottom of the screen.
The home screen doesn’t just show apps. It can also show widgets. Widgets are small boxes that display useful information or let you do simple tasks without opening an app. For example, a weather widget might show the current temperature and forecast, or a clock widget shows the time and date. Widgets help you get information at a glance.
Here are some key points about the home screen and icons:
- Icons represent apps: Each icon is like a door to a specific app.
- Tapping an icon opens the app: Just touch the icon once with your finger.
- Multiple home screens: If you have many apps, your phone may have several home screens you can swipe between.
- Widgets provide info quickly: Small boxes on the home screen show useful info like weather or calendar events.
- Arrange your icons: You can move icons around to place your favorite apps where you find them easiest.
To make things easier for seniors, many smartphones and apps use large icons and clear labels. This helps avoid confusion and makes it easier to see what each icon does. When icons are bigger, it is easier to tap them without missing.
Imagine the home screen as a simple map that helps you travel through your phone. Each icon is like a signpost pointing to different places: one sign might lead you to the phone for calls, another to messages, and another to photos. Knowing how to read this map makes using the phone less stressful and more enjoyable.
Sometimes, you may want to add a new app to your home screen. This can be done by downloading apps from the app store, and then placing their icons on the home screen for quick access. Similarly, if there are apps you don’t use often, you can remove their icons from the home screen to keep it clear and simple.
Smartphones often come with features to help seniors customize the home screen to their needs. For example, on some phones, you can switch to “Easy Mode” or activate a “Senior Mode.” These modes show only the most important apps with larger icons and simpler layouts. This reduces clutter and makes navigation easier.
Here is how you can make the most of the home screen:
- Put your most-used apps on the home screen: This saves time and avoids searching through menus.
- Create folders: You can group similar apps together, like all your games or all your health apps, into a single folder with one icon. Opening the folder shows all those apps.
- Use call shortcuts: Place icons for important contacts on the home screen so you can call them with one tap.
- Keep the home screen tidy: Remove icons or widgets you don’t use to avoid confusion.
Many smartphones also allow you to change the size of the icons and text on the home screen. Increasing the size can make the icons and words easier to see and tap, which helps seniors who have trouble with small print or small buttons.
It is also helpful to understand some basic gestures used on the home screen:
- Tapping: Touch an icon once to open the app.
- Swiping: Slide your finger left or right across the screen to move between different home screens or to scroll through lists.
- Long press: Touch and hold an icon for a moment. This allows you to move the icon, remove it from the home screen, or see additional options.
Another important feature on many smartphones is the “dock.” The dock is a row of icons usually found at the bottom of the home screen, which stays the same no matter what home screen page you are on. This is where you typically place your most-used apps, like Phone, Messages, and Camera, for easy access from anywhere on your phone.
Understanding the home screen and icons helps you feel more confident and independent with your smartphone. It is like learning to read a new map or control panel. Once you know where things are and what the symbols mean, your phone becomes a helpful tool rather than a confusing gadget.
Remember, if you ever get lost on your phone, there is usually a “Home” button or gesture that will bring you back to the home screen. This is like pressing a “reset” button to start fresh. Knowing this can reduce stress if you accidentally open the wrong app or screen.
Finally, if you want to personalize your home screen, many phones let you change the background picture. This can be a photo of your family, a favorite place, or something simple and calming. A familiar background can make your phone feel more welcoming and easier to recognize.
Making and Receiving Calls
One of the most important and basic uses of a smartphone is making and receiving phone calls. This might sound simple, but for seniors who are new to smartphones, it can feel tricky at first. Let’s explore how to make this simple and easy, so you can stay connected with your family and friends without any worries.
How to Make a Call
Making a phone call means you are reaching out to someone to talk to them using your smartphone. Here are the key steps and tips to make calling easier:
- Find the Phone App: Look for the phone icon on your home screen. It usually looks like a green square with a white telephone receiver inside. Tap on it to open the phone dialer.
- Using Contacts: If you have saved phone numbers in your contacts, you do not have to remember the number. Simply open your contacts list inside the phone app, find the person you want to call by scrolling or searching their name, and tap on their number to start the call.
- Dialing Numbers: If the person’s number is not saved, you can dial the number manually. After opening the phone app, a keypad should appear with numbers 0 through 9. Tap each number to enter the phone number you want to call.
- Emergency Calls: Some phones have a special emergency button. For example, on some senior-friendly phones, you can press and hold an emergency call button, and the phone will ask if you want to call 9-1-1 (or your local emergency service). This avoids needing to dial the emergency number by hand.
- Start the Call: After entering the phone number or selecting a contact, find and tap the green “Call” button. This will make the phone start ringing the person you want to talk to.
- Ending the Call: When you finish your conversation, tap the red “End Call” button to hang up. This button usually looks like a red phone receiver facing down.
Some smartphones for seniors offer larger buttons and clearer text to make seeing the numbers easier. This helps reduce mistakes when dialing. The phone might also have voice commands, so you can say “Call John” and the phone will dial the right number for you. This is especially helpful if you find tapping small buttons difficult.
How to Receive Calls
Receiving calls means answering when someone calls you. This might seem easy, but for some seniors, it can be confusing if the phone rings and they do not know how to answer. Here are ways to make it simple:
- Recognize Incoming Calls: When someone calls you, your phone will ring or vibrate. You will also see the caller’s name or number on the screen if it is saved in your contacts.
- Answer the Call: To answer, look for a green button or a slide bar that says “Answer.” Simply tap the green button or slide the bar, and you will be connected to the person calling.
- Decline the Call: If you cannot or do not want to answer, tap the red “Decline” or “End” button. This stops the phone from ringing and sends the call to voicemail if you have that service.
- Using Speakerphone: During the call, if you want to hear the other person louder or want to talk without holding the phone, tap the “Speaker” button. This allows you to hear the conversation through the phone’s loudspeaker.
- Video Calls: Some phones, like the RAZ Memory Cell Phone, allow video calls. These work just like voice calls, but you can also see the person on your screen. To answer a video call, tap the green video button. The call will connect, and you can see and talk to your loved one.
Many senior-friendly phones disable the volume button or set the volume to maximum to avoid accidentally turning the sound down and missing a call. The screen might stay on so you can easily see who is calling without unlocking the phone.
Special Features to Make Calling Easier for Seniors
Some smartphones and cell phones made especially for seniors include helpful features to simplify making and receiving calls:
- Large Buttons and Text: Phones designed for seniors often have bigger numbers and letters on the screen. This helps when you have trouble seeing small text or buttons.
- Simple Menu Systems: The phone menu often has fewer steps and less clutter. This means fewer confusing options and easier navigation to calling functions.
- One-Touch Calling: Many phones allow saving important contacts on a single button. For example, one button might call your doctor, another your family member. Just press and hold the button to call, no dialing needed.
- Caregiver Control Apps: Some phones, like the RAZ Memory Cell Phone, let family or caregivers manage the phone remotely. They can add contacts, set reminders, or block unwanted calls. This helps keep the senior safe and connected without needing to handle all settings themselves.
- Automatic Keypad for Toll-Free Numbers: Some phones automatically show the keypad when calling toll-free numbers. This helps when you need to press extra numbers to navigate automated menus, such as calling a doctor’s office or service hotline.
- Missed Call Notifications: The phone can alert you if you miss a call. This way, you can call back later and not worry about missing important calls.
- Blocking Calls at Certain Times: To avoid disturbances, caregivers can set the phone to block calls during night hours. This helps seniors rest without unexpected calls.
Tips for Comfortable Calling Experience
To make phone calls more enjoyable and less stressful, try these helpful tips:
- Use Headphones or Hearing Aids: If you have trouble hearing, use headphones or hearing aids designed to work with your phone. Some phones are compatible with special hearing devices.
- Stay in Quiet Places: When making or receiving calls, try to be in a quiet room to hear better without background noise.
- Practice Calling: It’s normal to feel unsure at first. Practice calling a family member or friend to get comfortable with the process.
- Keep Important Contacts Saved: Save frequent contacts like family, friends, and doctors in your phone. This saves time and effort in dialing.
- Ask for Help When Needed: Don’t hesitate to ask family or friends to show you how to use calling features. With practice, it will become easy.
Using Voice Commands to Call
If you find it hard to press buttons or search for contacts, voice commands can help. Many smartphones have features where you can say a command like, “Call Mary” or “Dial 123-456-7890,” and the phone will make the call for you. This feature is often called a “voice assistant.”
To use voice commands, activate the assistant by pressing a button or saying a special phrase. For example, on many phones, saying “Hey Google” or “Hey Siri” wakes the assistant, then you can say your command. This lets you make calls without touching the phone at all.
Video Calling Basics

Besides regular phone calls, video calls are a wonderful way to see and hear loved ones. Seniors can use simple video call apps that show big buttons and clear pictures. Answering a video call is similar to answering a regular call but you also see the person on the screen.
Some phones have video calling built right in, making it easy to switch between voice and video calls without extra steps. Video calls help seniors feel closer to family, especially when visits in person are hard.
Practicing video calling with friends or family helps build confidence. Make sure you have good internet connection and a quiet, well-lit room for the best experience.
Sending and Reading Text Messages
Text messaging is one of the easiest ways to keep in touch with family and friends. It allows you to send quick notes, share news, or just say hello without needing to make a phone call. For many seniors, texting has become a part of daily life because it’s simple and can be done anytime, anywhere. Let’s explore how to send and read text messages step-by-step, and how to make the experience comfortable and safe.
Finding Your Messaging App and Contacts
Every smartphone comes with an app that lets you send and receive text messages. This app is usually called “Messages” or “Messaging.” It often has an icon that looks like a speech bubble or a chat bubble. To start texting, find this app on your home screen or in the list of apps and tap it once.
Inside the app, you will see your recent conversations listed by the person’s name or phone number. To send a new message, look for a button that says “New Message,” “Compose,” or shows a plus sign (+) or a pencil icon. Tap this button, and you will be taken to a screen where you can choose the person you want to send a message to.
To add a recipient, you can start typing their name or phone number in the “To” field. Your phone will usually suggest contacts from your address book as you type, making it easier to find the right person. Tap the correct contact to select them for your message.
Writing Your Message 
Once you have selected a contact, a blank space will appear where you can type your message. Here are some helpful tips to make typing easier:
- Use the on-screen keyboard: Tap on the blank message area to bring up the keyboard. Each letter, number, or symbol can be typed by pressing the corresponding key on the keyboard.
- Type slowly and carefully: If you make a mistake, you can tap the backspace or delete key to erase the wrong letter.
- Voice-to-text option: Many smartphones have a microphone icon on the keyboard. Tap it and speak your message out loud. The phone will change your words into written text. This feature is great if typing feels difficult or slow.
- Keep messages short and simple: Use clear and easy words. Text messages are often brief notes, so you don’t need to write long paragraphs.
- Avoid using all capital letters: Typing in all caps is like shouting and can be misunderstood.
Sending the Message
After you type your message, look for the “Send” button. It usually looks like a paper airplane or an arrow. Tap this button to send your message to the person you chose. Your message will appear in the conversation screen, usually on the right side, showing that it has been sent.
Sometimes, your message might take a few seconds to send, especially if you are in a place with weak phone service or poor internet connection. If the message does not send, your phone will usually show a small red exclamation mark or another symbol. You can try pressing the send button again once you have better service.
Reading Incoming Messages
When someone replies to your text, your phone will alert you with a sound, vibration, or a notification on the screen. To read the new message, open your messaging app, and tap on the conversation with that person. The new message will appear on the left side of the screen, usually in a different color to separate it from your sent messages.
Take your time reading the message. If you need to, tap on the text to zoom in and make it easier to see. You can adjust the font size on your phone’s settings to make all text larger and easier to read.
Understanding Message Types and Features
Most text messages are simple notes made up of words and numbers, but modern messaging apps can do more:
- Emojis: These are small pictures or icons that show feelings or ideas. For example, a smiley face 😊 means happiness. Using emojis can help make your message friendlier or clearer, but don’t feel you have to use them if you don’t want to.
- Photos, videos, and audio messages: You can send pictures or short videos inside messages. Some phones also allow sending voice recordings instead of typed messages.
- Read receipts: Some phones show when the person has read your message. This feature helps you know whether your message was seen.
- Typing indicators: You may see dots or a message like “typing...” that tells you the other person is writing a reply.
These features depend on the phone and the messaging app you use. For example, newer phones support a messaging technology called RCS (Rich Communication Services), which allows for richer features like read receipts and typing indicators. Older phones or basic texting might not have these options.
Making Text Messages Easier to See and Use
Reading small text can be hard for some seniors. Luckily, you can adjust settings on your phone to help:
- Increase font size: Go to your phone’s Settings, find the Display section, and look for “Font size” or “Text size.” Slide the bar to make the text bigger. This will make messages easier to read.
- Bold text: Some phones allow you to make the text bold, which makes letters thicker and clearer.
- High contrast mode: Turning on high contrast makes the text stand out better from the background.
- Use voice-to-text: If typing is difficult, try voice-to-text features to speak your messages instead of typing.
Safety Tips for Text Messaging
Texting is convenient, but it is important to be careful. Here are some safety tips to protect yourself:
- Only text people you know: Don’t reply to messages from unknown numbers, especially if they ask for money or personal information.
- Don’t share sensitive information: Never send passwords, bank details, or Social Security numbers by text.
- Beware of scams: Some messages may try to trick you into clicking links or giving away your information. If a message looks suspicious, do not click any links.
- Use the block feature: If you get unwanted or suspicious messages, use your phone’s block option to stop receiving texts from that number.
- Keep your phone updated: Regular software updates help protect your phone from security problems.
Backing Up Messages and Keeping Conversations Safe
It’s a good idea to back up your text messages regularly. Backing up means saving your messages so they won’t be lost if your phone is lost, damaged, or replaced.
Most smartphones can back up messages automatically or manually to a cloud service like Google Drive or iCloud. This way, when you get a new phone, you can restore all your old messages easily.
To back up your messages, look in your phone’s Settings under “Backup” or “Accounts and Backup.” Follow the instructions to make sure your messages are saved safely.
Practical Tips for Beginners
If you are new to texting, here are some helpful hints to get started:
- Practice often: The more you text, the easier it will become.
- Start with simple messages: Try saying “Hello” or “How are you?” to practice sending texts.
- Ask for help: Don’t hesitate to ask a family member or friend to show you how to text or to practice with you.
- Take it slow: Learning new technology takes time. Don’t rush to learn everything at once.
- Learn abbreviations gradually: You might see shortcuts like “LOL” (laugh out loud) or “BRB” (be right back). You can learn these little by little when you feel comfortable.
By understanding how to send and read text messages with confidence and care, you can stay connected with loved ones easily. Texting can be a quick, simple, and safe way to share moments, even when you aren’t able to talk on the phone.
Adjusting Volume and Screen Brightness on Your Smartphone
When using a smartphone, two very important settings you often need to change are the volume and the screen brightness. These settings help you hear your phone sounds clearly and see the screen comfortably, no matter where you are or what time of day it is. For seniors, understanding how to adjust these settings can make using a phone easier and more enjoyable. Let’s explore how to do this in detail, with simple steps and helpful tips.
Changing the Volume: Making Sounds Just Right
The volume on your smartphone controls how loud or soft sounds come from your phone. Sounds include phone calls, notifications, music, or videos. Sometimes, you might want the sounds louder, such as when you are in a noisy place, or softer, when you don’t want to disturb others around you. Here are different ways to adjust volume on most smartphones:
- Using the Physical Buttons: Most smartphones have volume buttons on the side. Press the top button to make the sound louder and the bottom button to make it quieter. It’s like turning the volume knob on a radio or TV.
- Volume Controls on the Screen: When you press a volume button, a volume slider usually appears on the screen. You can slide your finger up or down on this bar to fine-tune the volume level.
- Adjust Volume Inside Apps: Some apps, like video players or music apps, have their own volume controls. You can look for a small speaker icon or a slider inside the app to change volume just for that app.
For example, when watching a video, you can slide your finger up or down on the right side of the screen to increase or decrease the sound volume if the app supports it. This feature is available in many video apps like MX Player or the phone’s default video player.
Sometimes, you need to adjust the ringtone volume separately from other sounds. Ringtone volume controls how loud your phone rings when someone calls you. You can usually find this setting in your phone’s sound settings under “Ringtone and Notification Volume.” Increasing this volume helps if you have trouble hearing your phone ring.
Finding the Right Brightness: Easy on Your Eyes
Screen brightness is how light or dark your phone’s display looks. Adjusting brightness helps you see the screen clearly and avoids eye strain, especially for seniors who may have sensitive eyes. Brightness should be higher in bright places like outside on a sunny day and lower in dark or indoor places to avoid discomfort.
- Adjusting Brightness with the Quick Settings: Swipe down from the top of your screen to open the Quick Settings panel. Here you’ll see a brightness slider, usually marked with a sun icon. Slide your finger left to make the screen darker or right to make it brighter.
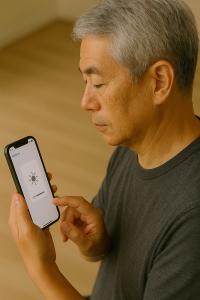
- Using Phone Settings: You can also change brightness in the main settings menu. Go to “Display” or “Brightness” in your settings app. Here, you can move a slider for brightness just like in Quick Settings.
- Adaptive or Auto Brightness: Many phones have a feature called “Adaptive Brightness” or “Auto-Brightness.” When turned on, the phone uses sensors to detect the light around you and adjusts the screen brightness automatically. This means you don’t have to change it yourself often.
For seniors, keeping adaptive brightness on can be helpful so the phone adjusts on its own. But if you find the screen too bright or too dark, you can turn off adaptive brightness and set the brightness manually.
In some cases, the screen might feel too bright even at the lowest setting. Some phones offer an “Extra Dim” or “Night Mode” in the accessibility or display settings. This reduces brightness beyond the normal limit and can be easier on sensitive eyes, especially at night.
How Volume and Brightness Settings Help in Everyday Use
Knowing how to adjust volume and brightness improves your smartphone experience in many ways:
- Better Hearing: If you have trouble hearing, increasing the volume makes phone calls, alerts, and videos easier to hear. You can also connect hearing aids or use features like Sound Amplifier on some phones to make sounds clearer.
- Comfort for Your Eyes: Adjusting screen brightness prevents your eyes from getting tired or strained. For example, if you are reading a text message in a dark room, lowering brightness stops the screen from shining too brightly and hurting your eyes.
- Saving Battery Life: Lower screen brightness helps your phone’s battery last longer. Bright screens use more power, so dimming the screen when possible means you can use your phone longer before charging.
- Adapting to Different Environments: Whether you are indoors, outdoors, day or night, adjusting brightness and volume helps you use your phone comfortably without struggling to see or hear.
Accessibility Features to Make Adjustments Easier
Many smartphones have special features that assist seniors or those with visual or hearing difficulties:
- Screen Brightness Gesture Control: Some video player apps allow you to slide your finger up or down on one side of the screen to change brightness quickly while watching videos. This makes it easy to adjust without leaving the app.
- Volume Control with Voice Commands: Using voice assistants like Siri or Google Assistant, you can say commands like “Increase volume” or “Lower screen brightness.” This hands-free option is great if you have trouble using buttons or touch controls.
- Louder Ring and Alerts: On iPhones, you can increase the ringtone volume in “Sounds & Haptics” settings. Android phones also have similar settings to boost alert sounds for better hearing.
- High Contrast and Large Text: Increasing text size and using high-contrast display settings (like dark mode or bold text) can improve visibility when adjusting brightness, so you can see the controls clearly.
Practical Tips for Seniors When Adjusting Volume and Brightness
- Practice Using Buttons: Try pressing the volume buttons on the side of your phone to get comfortable with how they feel. Watch the volume bar appear on the screen to see the change live.
- Use Simple Apps: Some video players have easier controls for adjusting brightness and volume. Apps like MX Player offer on-screen sliding gestures for both, making it friendly for all users.
- Set Comfortable Defaults: Find a good everyday brightness and volume level that works for most of your activities, then adjust only when needed, so you don’t have to change them all the time.
- Turn On Accessibility Features: Use features like Sound Amplifier or larger text to help you see and hear better. Don’t be afraid to explore these options in your phone’s settings or ask for help setting them up.
- Be Mindful of Surroundings: If you are in a quiet place like a library, lower your volume and brightness to avoid disturbing others and to protect your eyes from strain.
Remember, adjusting volume and brightness is about making your phone comfortable to use and easy to see and hear. You can always ask a family member or friend for help the first few times until you get used to it. With these skills, you will feel more confident and independent when using your smartphone every day.
Using the Camera for Photos and Videos
Taking photos and videos with your smartphone can be a fun and rewarding way to capture special moments, remember important events, and even tell stories through pictures. Smartphones today have powerful cameras that are easy to use, which means you don’t need a big, expensive camera to take great pictures. This section will guide you through how to use your phone’s camera step-by-step, with helpful tips to make your photos and videos look better and how to enjoy this hobby safely and comfortably.
Getting to Know Your Camera Features
Before you start snapping photos or recording videos, it helps to get comfortable with what your phone camera can do. Most smartphones have several modes and settings designed to help you take different kinds of pictures. Here are some common features you might find:
- Photo Mode: This is the standard mode to take still pictures.
- Video Mode: This lets you record moving pictures with sound.
- Portrait Mode: This mode helps you take photos that focus on a person or object and gently blur the background for a professional look.
- Panorama Mode: This allows you to take a wide, sweeping photo of landscapes or large groups by moving your phone slowly from side to side.
- Flash: A light your phone can use in dim places, but it’s often better to use natural light if you can, since the flash can sometimes cause glare or unnatural colors.
- Zoom: This lets you get closer to your subject without physically moving, but be careful—zooming in too much can make your photo blurry.
Try opening your camera app and gently tapping on the different options to see what they do. Don’t worry about making mistakes; you can always delete photos you don’t like. With practice, these features will become easier to use.
Preparing Your Phone for Taking Photos and Videos
Before you take pictures or record videos, it’s a good idea to get your phone ready. Here are some simple steps to prepare:
- Clean the Camera Lens: The lens on your phone can get dirty from fingerprints, dust, or grease. Use a soft cloth, like a glasses cleaning cloth, to gently wipe it clean. This will help your pictures come out clear and sharp.
- Check the Battery: Taking photos and videos uses battery power. Make sure your phone has enough charge, especially if you plan to take many photos or record videos for a while.
- Turn Off the Flash: Unless you really need it, turn off the flash to avoid harsh light and better use natural lighting.
- Set Your Camera Settings: Some phones allow you to adjust settings like brightness (exposure) or focus. It’s worth exploring these, but at first, the automatic settings usually do a good job.
- Hold Your Phone Steady: To avoid blurry pictures or shaky videos, hold your phone with both hands. If your hands are shaky, resting your elbows on a table or using a tripod can help keep the phone steady.
Using Natural Light for Better Photos and Videos
Light is one of the most important parts of good photography and videography. Whenever possible, try to use natural light, like sunlight. Here’s why:
- Natural light is softer and shows true colors better than artificial light or flash.
- Taking photos outside during the day gives your pictures a fresh and lively look.
- If you’re indoors, try to position your subject near a window where sunlight can illuminate their face or the object clearly.
- Avoid direct sunlight on your subject, as it can create harsh shadows or make people squint. Instead, find shaded or evenly lit areas.
Experiment with taking pictures at different times of the day. For example, photos taken in the early morning or late afternoon often have a warm, golden tone called "golden hour," which is very flattering.
Framing Your Shot: What to Include in the Picture
Framing is how you arrange the parts of your photo or video inside the screen. Think of your phone’s camera screen like a little window through which you see the world. What you include or leave out changes the story your picture tells.
- Focus on Your Subject: Make sure the main thing you want to capture is clear and in the center or slightly off-center—this often looks more natural.
- Use the Rule of Thirds: Imagine your screen divided into nine equal parts by two lines across and two lines down. Try to place important parts of your photo along these lines or where they cross. Many camera apps have a grid option to help with this.
- Avoid Clutter: Try to keep the background simple so it doesn’t distract from your subject.
- Try Different Angles: Don’t always take a picture from eye level. Move your phone up, down, or to the side to find a more interesting or flattering view.
- Fill the Frame: If your subject is small, move a bit closer or zoom in slightly (but avoid too much zoom to keep the picture clear).
Taking Photos and Videos: Step-by-Step
Here’s a simple guide to taking photos and videos with your smartphone:
- Open the Camera App: Find and tap the camera icon on your home screen or apps menu.
- Choose Photo or Video Mode: Swipe or tap the mode button to select if you want to take a photo or record a video.
- Frame Your Subject: Point your phone’s camera at what you want to capture. Use the tips above to position your subject well.
- Focus: Tap the screen where your subject is to make sure the phone focuses on it. This makes the picture sharp.
- Hold Still: Keep your hands steady or rest your elbows to avoid blurring.
- Press the Shutter Button: Tap the round button on the screen to take a photo. For video, tap the red button to start recording and tap again to stop.
- Review Your Photo or Video: After taking it, look at your picture or video by tapping on the thumbnail in the corner. If you don’t like it, you can delete it and try again.
Using the Timer and Stabilization Tools
Your smartphone often has a timer feature, which means the camera waits a few seconds before taking the picture. This is useful when you want to be in the photo yourself or avoid shaking the phone when you press the shutter button.
- Set the Timer: Usually, you can choose between a 3-second or 10-second delay. Pick the one that gives you enough time to get ready.
- Use a Tripod or Stable Surface: If you have a small tripod or can place your phone on a stable surface, use it to keep the phone steady, especially for group photos or videos.
- Hold the Phone Firmly: Holding your phone with both hands and keeping your elbows close to your body helps reduce shaking.
- Use Accessories: Some phones allow you to attach grips or rings to make holding easier and steadier.
Editing and Sharing Your Photos and Videos
After you take pictures or videos, your phone lets you make simple changes to improve them.
- Crop: Cut out extra space to focus more on your subject.
- Adjust Brightness and Color: Make your photo lighter or darker, or change the colors to make them look better.
- Add Filters: These are like special effects that change the mood of your photo. But it’s best to start with the original photo and experiment.
- Save Copies: Keep your original photo safe and save edits as new copies so you can always go back.
Once you’re happy with your photos or videos, you can share them with family and friends by sending them in messages, email, or posting them on social media if you use it. Sharing your images can help you feel connected and proud of your work.
Practice Makes Perfect
Photography is a skill that improves the more you practice. Don’t worry if your first pictures don’t look perfect. Try taking photos of different things around your home, like flowers, pets, food, or your favorite chair. Try photos outside of trees, buildings, or birds. The more you use your camera, the easier it will get.
Try taking pictures in different lighting, using different angles, and experimenting with your phone’s camera modes. Remember, it’s okay to delete photos you don’t like—digital photography means you’re not wasting any film!
By regularly using your camera and trying new things, you will get more confident and enjoy this creative hobby that helps you capture memories and share your unique view of the world.
Building Confidence and Independence with Your Smartphone
 Learning to use a smartphone may seem like a big challenge at first, but understanding the essential parts and functions transforms the device into a helpful companion in your daily life. By remembering the roles of different buttons, practicing simple touchscreen gestures, and caring for your phone with good habits like regular restarts and smart charging, you keep your device working well and ready for use.
Knowing how to navigate the home screen, find and open apps, and manage communications through calls and messages helps you reach out and stay connected with your loved ones effortlessly. Using video calls and messaging brings family and friends closer, even when you’re apart. Adjusting volume and brightness settings and taking advantage of accessibility features make your smartphone easier and more comfortable to use, catering to your individual needs.
With these skills, you’ll not only gain greater independence but also reduce frustration and enjoy the many benefits technology offers, from sharing memories with photos and videos to accessing important information safely. Remember, technology is a tool meant to serve you, and with practice and patience, you can master your smartphone at your own pace, opening up a world of possibilities that help you stay informed, entertained, and connected.
Audio
Video